If you are reading this I’m assuming you want to become a self-published author. If that is the case, I hope this will help you reach your dreams.
Before we start I want to give a bit of a disclaimer…
This is a walk through to show you how to become a self-published author with CreateSpace. There is no setup fee for this but there are some things I’m going to cover that you may need some money for. For example, you may want or need a website to promote your book. Or maybe, a professionally designed book cover. I will show you how to take care of all of this for about $50. If you decide to build a website to promote your book then you need to understand that the cost included in the $50 I’m spending will be recurring for hosting. (Starting at $7.99/month & Maxing out at $15.99/month which is the package I’m on.) There are no guarantees with this blog post. This blog is for information purposes only and is only based on my experience & opinion. Please seek professional help with any legal or business matters.
One last disclaimer… In pure transparency, I want to let you know that I may get commissions for you taking my advice and using the links I place on this page to make a purchase or visit a website.
Now, How to Become a Self-Published Author
Now, if you haven’t started writing your book, don’t worry. We will get to that part later. (Including how to format a book for self-publication with Amazon & Create Space)
We’ll start off like all you know is you want to write a book and have an idea for the title & topic.
The first thing you are going to need to do is to create an account at Create Space.
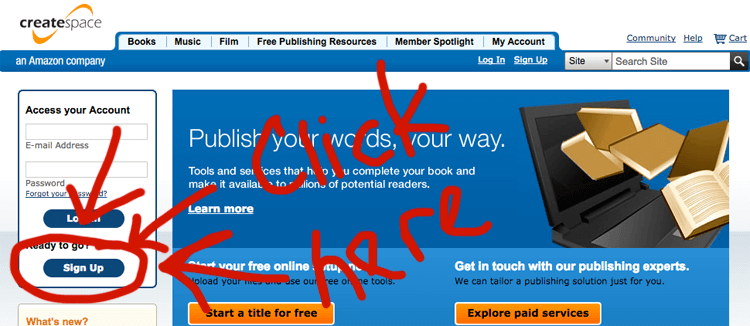
Ok so now you are going to sign up …
Just take a few minutes and create an account by filling in the fields. The page will look like this.
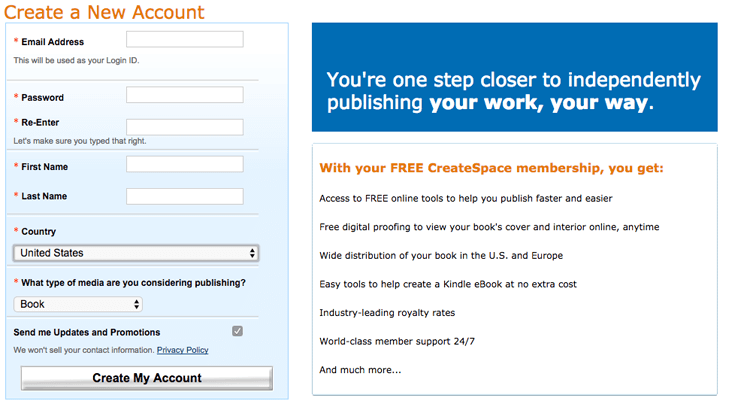
(If you are still on this page, fill out the info and click “Create My Account”)
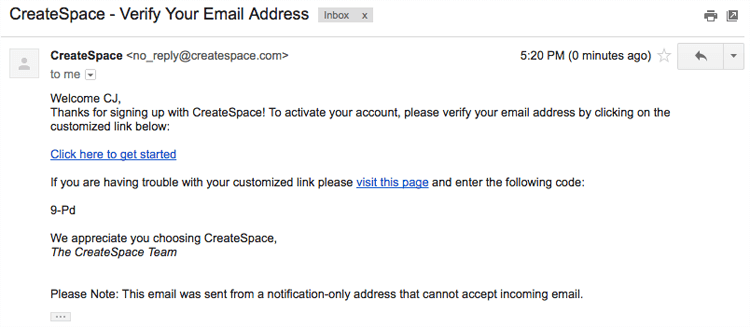
The next page will ask you to agree to their terms … Read it over and if you agree, continue. Then you’ll need to verify your account within your email. So go to your email and look for an email with the subject line “CreateSpace – Verify Your Email Address”. Then click on the link in the email “Click here to get started” (See Below)
Let’s go into the steps you will need to take, in order to get started writing your book.
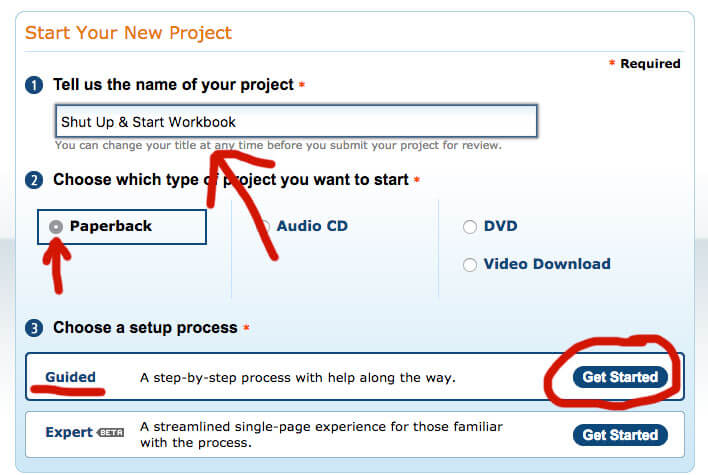
The first thing you will do is start by adding your Title. Don’t worry if you aren’t 100% sold on the title yet. You can always change it later
Then you’ll need to check the circle for “Paperback” (Otherwise you wouldn’t be publishing a book :P )
Then you need to click on “Get Started” for the Guided Process.
Once you have done a few books, you may want to switch to “Expert”. Honestly, this is the 10th book I’ve submitted and started with CreateSpace. That being said, I still love using the “Guided Process”. CreateSpace is amazing for making it this simple to become a self-published author.
OK… Congrats! You have officially started and are on your way towards becoming an actual published author.
The next page will ask you to fill out some information. I am only filling out the necessities for right now. Remember you can change your information later if you need to. So if you don’t have a subtitle yet, don’t worry you can add it later.
So for right now, I’m going to just fill out the Subtitle & Primary Author. Then, click on “Save and Continue”.

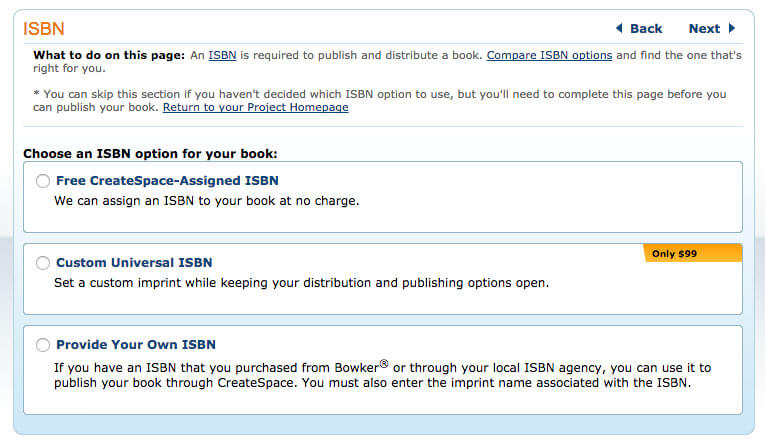
Now that you have done that you will need to create a free ISBN number … You do have 2 other options but since I’m trying to get you up and going with as little money as possible … we only need to check “Free CreateSpace Assigned ISBN”

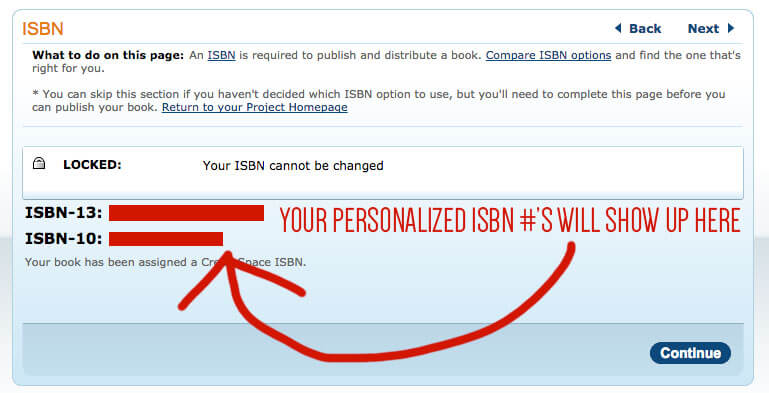
Next thing, the CreateSpace ISBN tab will expand and then you need to click on “Assign Free ISBN”
You will be given ISBN numbers. I recommend copying these down in a notepad or a Word document. You will be using them here in a bit. Now click on Continue
Now you need to decide on what size your book is going to be. I have really grown to like the 5 x 8 size. But, I’ve been doing a lot of smaller books so it works for me. If you are writing a larger book then you may want to go with the standard 6 x 9.
If you don’t wish to use 6 x 9 then click “Choose a Different Size” and select the size you want to use.


Now that you have selected your desired book size, it’s time to get your template and start writing.
So on the cover page, you will want to select your interior options. I do my books in black and white and I prefer the white pages over the cream pages. (you can change it after you get your first proof if you don’t like it and want to change something.
The next thing you are going to want to do is to download the “Formatted Template”.
Now, Go, Write!!! :)
I am not a guru or anything like that when it comes to Microsoft word. I’m using an older version so screen captures or video really wouldn’t help you right now. With that being said, I can’t go much deeper in this until I finish this book … may take me a few weeks since I’m starting from scratch here. But, I will continue to update this as I work through the process.
*******************************
Moving forward I plan on going into a quick website design tutorial so you can make a website and/or blog that you can use to promote your book. There will be a few more things added here … So hang in there … it’s coming.
Last Updated: August 8, 2017

